Showing posts with label Cookies. Show all posts

Thursday, September 17, 2009

Rugelach

My mom has cousins living in Israel, and one of them was coming to visit with her hubby and 1 year old. I don't get to see them that often, so I was very excited. Of course, of course, of course I had to bake dessert for the following night that they were coming over for dinner. Something tasty, wonderful flavors, great texture, and comes from the background of Israel. 1 word: R-U-G-E-L-A-C-H. I never made rugelach before this, but I was eager to try.
I found probably the best recipe I could have found, from the fabulous, Ina Garten. The link to the recipe is: http://www.foodnetwork.com/recipes/ina-garten/rugelach-recipe2/index.html

I didn't have the apricot preserves that the recipe called for, so what I did was
1. Quartered up some dried apricots.
2. Put them into the blender with a few very small drops of lemon juice, a splash of orange juice, and however much sugar I needed to sweeten it up.
3. I pureed everything together, adding as much hot water as I needed to thin out the puree.


I really liked the little creation I had made as my replacement for the apricot reserves. It had a nice texture from the apricots which couldn't get completely pureed, and was perfectly sweet. In the future, I will definatlly use this puree again instead of buying a whole jar of apricot preserves, although one day I have to try the preserves to compare the differences. Anyhow, both ways seem delicious.

As far as the assembly of the rugelach went, it was a bit time consuming, but all the steps were very simple.
Start out with rolling one of the 1/4's of the dough into a round cirle. Don't worry about getting the edges straight, because the edges are going to be unseen after you roll them up anyways.

Next spread out your layer of apricot puree (I spread it out with a brush)

Sprinkle on the sugar/nut mixture, and then cut the cirlce into 12 even wedges.


Roll up a wedge at a time, starting from the biggest side of the triangle wedge.


After you've got them all rolled up and on a baking sheet, give them all an egg wash, and then sprinkle on the cinamon sugar mix


These rugelach were one of the best things Iv'e every baked. That surprises me, because I didn't even think I like rugelach. Everytime I bake somthing, I can't help but think of all the things I could have added or shouldn't have. But these, oh these were just about perfect. The only complaint I would have with these, besides being so addictingly good, is how the sugar sprinkled on top of them created a hard chewy crust on the bottom of each, although that complaint was turned into a complament by many of the guests who enjoyed these treats with me, since they liked that sugary crust on the bottem.


We started out with 48 ruhgelach, I mean 45, considering all the ones I managed to sneak into my mouth right when they came out of the oven, at the begining of the night...


And were left with...
Sunday, September 6, 2009

Vanilla Almond Biscotti

Story of my life: mom always yelling at me because of the slightest mess Iv'e made through baking! So the pieces fell perfectly together when treats ran out, and I wanted to bake something, and my grandma wanted me to come over to her house that following afternoon to bake something for her...:D
My family and I were going on vacation in a couple of days, and my grandma, herself, was going on a cruz in a few weeks, so we decided on baking something delicious, very low on fat, and of course, something that can be kept/stored for a long time. Biscotti!!!

I found the recipe very special, because this had been passed down through friends of my grandmothers generation, but still the ingrediants and directions remained very simple for such a delicious dessert.

-3 cups A.P. white flour
-2 cups sugar
-4 eggs
-1 1/2 tsp. baking soda
-1 1/2 tsp. baking powder
-2 tsp. vanilla extract
-1/4 cup nuts such as walnuts or hazelnuts, alightly roasted/toasted (optional)
-1 cup almonds , slightly toasted/roasted
-1 cup almond powder

Directions:
Sift and then mix all the dry igrdediants into one large bowl together. Mix in the eggs. Mix in everything else and let it all mix until everythings combined into a dough. Form the dough into 2 even sized loaves and bake in the oven at


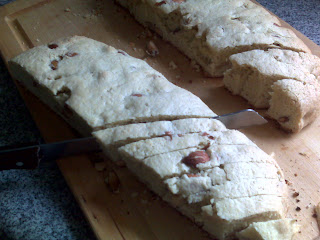
After the loaves cook in the over for about, take them out and slice them at an angle and place them on one of their flat sides into the oven for about another, flip them one more time, and let them bake for about another or until the edges start browning.


For the second biscotti loaf, we wanted to make the biscotti smaller, so we cut the load in half


The original recipe actually called for 2 cups of almonds, but since my grandmother had almond powder on hand, we added a cup less of almonds and a cup of almond powder instead.

The almond powder gave the biscotti a much stronger almond flavor then the whole almonds did, so I would add the almond powder into the dough the next time I bake these again. I you don't have any almond powder on hand, you can make i yourself by just tossing some almonds into the food prosseser, until they become as powdery an you want. Just be sure to use cold almonds, so that they don't turn into almond paste in the prosesser. If you don't feel like doing this, you can always add a few teaspoons of almond extract into the dough to give it a strong almond flavor.

Be sure to allow the cookies to cool completely before serving, in order for them to become as hard and crispy as possible. They store well and keep their crunchy texture in the freezer.

Sunday, August 2, 2009

Lemon Wafers with Lemon Glaze

I love the concept of a light and very tasty cookie and was lucky enough to find a great recipe for (mini) vanilla wafers on http://bakingbites.com/2008/07/mini-vanilla-wafer-cookies/, which has turned out to be one of my favorite basic cookie recipes. If you add an extra 1/4 cup of flour to the batter, it keeps the shape and form of the cookie you pipe out, so you can use any shaped you like. I decided to change the vanilla cookies into lemon cookies instead, and all I did was add 1 1/2 teaspoons of freshly squeezed lemon juice instead of the vanilla extract and used all white sugar. I zested the lemon earlier, and sprinkled the lemon zest on top of the cookies right before they went into the oven.
'Unwisely' I piped the batter into a bit more unique of a design than little rounds, and even though they looked nice going into the oven...

..the cookies didn't keep their shape and came out flat because of the low amount of flour put into them


To spice up their flat appearence, I mixed the extra lemon juice (about 1 tablespoon) with sifted powdered sugar (about 1/4-1/3 cup, depending on how thick you want your glaze) until they were fully combined togeher as a glaze. I just drizzled that glaze onto the cookies in rows of stripes, but be careful not to drizzle on too much, so that you don't overpower the cookies with it.


Once the glaze hardened, I had myself a batch of delicious petite lemon wafers with a lemony glaze :D

^^These cookies wern't photograghed with the most attractive looking "lemon zest stripes," but I tried

Saturday, August 1, 2009

Espresso Cookies with Chocolate Coating

I find myself baking a lot of cakes, and decided to go with cookies this week. I made up my own recipe, but it's just the ingredients for a basic cookie recipe, which i then added some ground coffee beans into it, for the extra flavor.

-1/2 cup butter (softened)
-1 egg
-1/2 cup white sugar
-1/4 cup light brown sugar
-1 1/2 cups all purpose white flour
-1/2 tsp salt
-1/2 tsp baking powder
-1/2 tsp vanilla extract
-1/2 tsp fresh coffee/espresso
-1 tsp ground coffee/espresso beans
-1/4 cup chocolate for melting

Directions:
1. Beat the butter and sugars together.
2. Once the butter and sugars are fully combined beat in the egg. Add the vanilla and fresh coffee/espresso
3. In a seperate bowl, sift together the flour, baking powder, salt, and ground espresso/coffee beans. Pour the flour mixture into the butter mixture while mixing, until everything is combined 4. I put my batter into a ziplock bag, and snipped a whole at the bottom, to pipe out logs onto a greased baking sheet. I also tried cutting the edges of each cookie of, with a rigid/wavy edge cutter, to give the edges of each cookie a wavy design, but after they baked up, the design got to crips and didn't look to good
5. Bake at 325 F for 15-25 minutes or until the edges start to turn a golden brown color

Let the cookies completely cool before adding a layer of chocolate on them


Melt half of the chocolate in the microwave, and then stir in the other half of the (finely chopped)chocolate into the melted chocolate , until it's all melted in. (This is a trick I learned from Ina Garten, from food network, and this assures you to have shiny tempered melted chocolate)


Once your melted chocolate is ready, spread on an even layer of chocolate over all or half of each cookie. I used semi-sweet chocoolate, because that's what I had on hand, but you can use a more bitter/darker chocolate to go with the slightly bitter coffee/espreso flavor from the cookies.


Once the chocolate has hardened (in the fridge to make it go faster) on the cookies, sit down with a cup of milk, coffee or, of course, espresso while enjoying one of your freshly baked espresso cookies!

Saturday, July 25, 2009

Chocolate Chip Cookie Brownies (C.C.C.B.)

Two of my friends birthdays were recently on the same day. We all met up togther for lunch with some other friends, and of course, you've got to have dessert on your birthday! One birthday girl is a big fan of brownies and the other of chocolate chip cookies, and I had spotted a recipe which layered chocolate chip cookie dough onto brownie batter on http://anotheronebitesthecrustblog.com/, an amazing blog that has all my favorite ingulgences in low-fat versions! So of course, I found a great brownie recipe as well as a chocolate chip cookie dough recipe to pile onto each other for the perfect birthday treat.

The brownie recipe I got was from, probably favorite food network star, Ina Garten, and I also halfened the recipe since I needed only a thin layer. The recipe given for her "Outrageous Brownies" is:
-1 pound unsalted butter
-1 pound plus 12 ounces semisweet chocolate chips, divided
-6 ounces unsweetened chocolate
-6 extra-large eggs
-3 tablespoons instant coffee powder
-2 tablespoons real vanilla extract
-2 1/4 cups sugar
-1 1/4 cups flour, divided- 1 cup for batter and 1/4 cup in the chips and nuts
-1 tablespoon baking powder
-1 teaspoon kosher salt
-3 cups diced walnut pieces

Directions
1. Preheat oven to 350 degrees F. Grease and flour a 13 by 18 by 1 1/2-inch sheet pan.
2. Melt together the butter, 1 pound chocolate chips, and bitter chocolate on top of a double boiler. Cool slightly. Stir together the eggs, instant coffee, vanilla and sugar. Stir in the warm chocolate mixture and cool to room temperature.
3. Stir together 1 cup of the flour, baking powder and salt. Add to cooled chocolate mixture. Toss the walnuts and chocolate chips with 1/4 cup flour to coat. Then add to the chocolate batter.
4. Pour into prepared pan. **I kept some exra brownie batter (a few tablespoons) to drizzle on top of the cookie batter going on top*
5. Bake for about 30 minutes, or until tester just comes out clean. Halfway through the baking, rap the pan against the oven shelf to allow air to escape from between the pan and the brownie dough. Do not overbake! Cool thoroughly, refrigerate well and cut into squares.

^^^^ ^^ ^^ ^^ ^^ ^^^^
If your making C.C.C.B.'s preheat the oven to anywere from 325-350F. Also don't put the brownie batter into the oven without putting on the layer of chocolate chip cookie dough over it first (recipe below)

For the layer of chocolate chip cookies I tried to find a recipe that had the longest cooking period possible to match up with the full half an hour of the brownies cooking time. This recipe I found only had to be baked for 15-17 and can be found on http://allrecipes.com/Recipe/Best-Big-Fat-Chewy-Chocolate-Chip-Cookie/Detail.aspx. To this recipe, I didn't add the extra egg yolk listed in the ingredients.

I actually made this batter before I made the brownie batter, and just let it 'chill' (haha get it..i know, it's not that funny) in the fridge while it was waiting. After I had the brownie batter poured into the pan, I poured the chocolate-chip cookie dough batter on top of the first layer


I then spread it out, and while spreading, I sort of dug into the brownie batter to get streaks of both batters mixed into each other


And with the extra brownie batter, I drizzled lines across the pan with it, which I then swirled in even rows


And just in case you think your kitchen is the only one that got messy while baking the batters..


Anyways, when putting the C.C.C.B.'s into the oven, i used the temperature of about 340 F, which was in the middle of both recipes cooking times, and I baked them for about 25 minutes total. The result is a more fudgy brownie with a chewy chooclate chip cookie on top, which tasted amazing with vanilla icecream! I also put the extras into the fridge which gave them such a nice chewy and rich texture.
Milk, meet your new best friend...

Wednesday, July 1, 2009

Hot Cocoa w. a Chocolate Chip Cookie on a Rainy Day

I was in charge of babysitting my brother on a cold rainy day, and the weather wasn't the only gloomy atmosphere. My brother happened to be having a bad day as well, and decided to take his gloomy attitude out on me. So what's better to cheer someone up than with a chocolate chip and hot cocoa with marshmellows??

I made a batch of chocolate chip cookie batter a while back and rolled the unused dough into little balls and plopped them into the freezer, so I could easily put them into the oven/toaster oven whenever I feel like a chocolate chip cookie.


Anyways, long sotry short, the cookies got baked and were placed next to a hot cup of cocoa which had marshmellows floating into it =]

Tuesday, June 30, 2009

Vanilla Cookies with Chocolate and Lots of Sprinkles

A couple of months ago I decided to make a pie with a vanilla wafer crust (unfortunatly I wasn't taking pictures of what I baked at that time so I have none to post). Anyways, I didn't have any on hand, and even if I did, I'm pretty syre I still would have tried this recipe http://bakingbites.com/2008/07/mini-vanilla-wafer-cookies/ from http://bakingbites.com/. To call these cookies vanilla wafer cookies are an insult. These cookies were beyond what you would find in a box/package of vanilla wafers. These were more flaky yet still crispy..and just plain delicious! They also held there shape really well especially when you add a little extra flour which made an unnoticable difference within the texture of the cookies.

My little cousins birthday was coming up and I wanted to bake her something simple, easy to grasp, yummy, and a little more than simple. I thought of making letters that would spell out her name and used the vanilla cookie recipe knowing it would hold its shape and taste delicious.

The taste and texture of the cookies definitally didn't dissapoint, but I wanted to add some color to them to really get my newly 3 year old cousin's attention. And whats more simple and tasty then chocolate (as the glue) and lots of colorful sprinkles.


This recipe was such a hit that when my neighbors invited us over for their monthly pizza night, I used this recipe again to bake them these amazing cookies.
This time I shaped them a bit differently, piping them into little 'S' swirls.

I also added some cocoa to the second half of the batter to add some variety which tasted just as good..I mean, what doesn't chocolate taste good in?!


Knowing a majority of the people would be kids, in my attempt to making the cookies look even more kids friendly, I again gave them a coating of chocolate and sprinkles


^sprinkles & ^ chocolate & ^cookies...oh my!


I used a bit of a different design with the chocolate/sprinkles for the chocolate cookies


Even when these cookies were covered in sprinkles and where placed next to more elegant cookies the neighbors had bought, all the adults had at least one of these cookies instead, and a decent amount ate 2 of them, using the excuse of having to sample both chocolate and vanilla flavors ;p

Sunday, June 28, 2009

Jump for Hearts Brownies and Cookies

Jump for Hearts is a heart foundation and my little brother's school was asked to raise money for it on there own. I love bakesales and always try finding excuses to have them at my age. Luckily my brother agreed and even though it was a cold day, we still sat outside for a few hours determine to get donations and sell our treats!

Going with the whole heart theme, I made a batch of brownies and with a heart shaped cookie cutter, cut the brownies into the shape of a heart.


Of course, what's a bake sale without chocolate chip cookies?! I have gone through so many chocolate chip cookie recipes, and tried a new recipe. Although their appearance looked a bit flat and the edges to dark, they had an amazingly chewy but still soft texture. Definitally how i love mine.


The ones towards the right side ^^ had chunks of walnuts in them


^ This was from when I was tryng to keep my little brother busy with pictures while we were waiting for someone to pass by on this chilly chilly day

Saturday, June 27, 2009

Biscotti with Chocolate and Nuts

Treats were running out in the house, so I used that as my oppurtunity to bake biscotti, something i had wanted to do for some time, especially after i discovered a great recipe from http://bakingbites.com/

She posted a basic recipe of biscotti in which she added strawberries which i thought was a brilliant idea and delicious combination, but with my huge sweet tooth, i took the chooclate route with them. The recipe I found was http://bakingbites.com/2009/02/chocolate-covered-strawberry-biscotti/, and instead of strawberries I added chocolate chips and nuts (roughly chopped walnuts and almonds).

Yea I know, i see that bight in it too...but hey, taking pictures of them made me hungry...=D


I also added some cocoa powder to half the batter, turning it into chocolate biscotti, as well as some fresh coffee for the extra flavor. Just like the other batch i made, i added the chocolate chips as well as the nuts as well as some chopped up chunks of dark chocolate.


The only mistake I made was taking it out of the oven when they still wern't super crisp, expecting them to get crunchier as they cooled, but the cooling process barely made a difference.

I took the pictures a couple days after i made them..of course all the picture perfect ones were gobbled up by the time i waited to take the pictures but the taste...oh that crispy, chocolatey, slightly nutty flavour....that hadn't gone anywhere :)

That's right, the ends got dipped into some velvety smooth melted chocolate and then dipped in a coating of chopped nuts...In the words of Rachel Ray "YUMMO"